
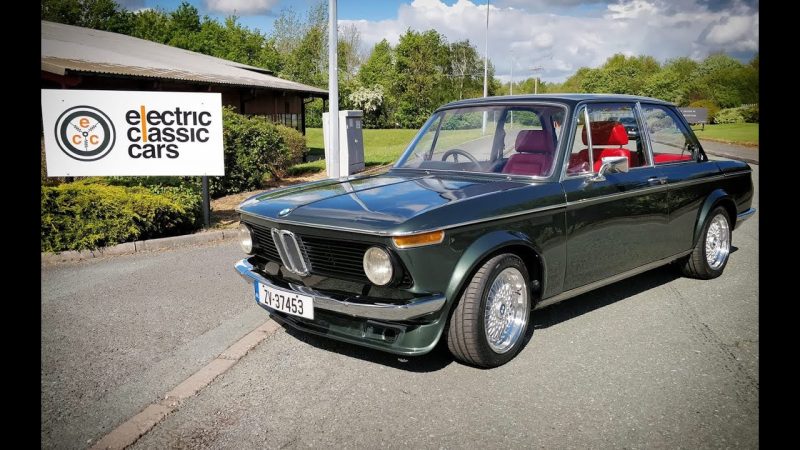


So, you’ve got that old car in the garage. The one with the beautiful lines and the soulful character, but maybe a temperamental engine and a gas habit that feels… well, a bit last century. Converting it to electric isn’t just a daydream anymore. It’s a tangible, deeply rewarding project that’s part engineering, part art, and all passion.
Honestly, it can feel overwhelming at first. Batteries, motors, controllers—it’s a new language. But here’s the deal: breaking it down into practical, manageable steps makes it all possible. Let’s dive into the real-world guides you need to turn your classic into a silent, swift, and sustainable cruiser.
Laying the Groundwork: Before You Wrench a Single Bolt
Jumping straight to parts shopping is a classic mistake. This phase is about strategy. Think of it as the blueprint for your entire build.
Choosing the Right Donor Vehicle
Not every vintage car is an ideal EV conversion candidate. You want a good foundation. Lightweight is your friend—every pound saved means less battery needed for range. Simple is too. A car with a straightforward engine bay and a robust frame makes the swap cleaner.
Common favorites? Older Volkswagens, Porsche 914s, classic Minis, and American compact trucks. They have space, relatively simple drivetrains, and a huge aftermarket for parts. That said, people are converting everything from Volvo wagons to Ford Mustangs. The key is knowing your limits and budget.
The Holy Trinity: Range, Power, Budget
These three factors are locked in a constant tug-of-war. You must define your priorities early.
- Range: Dreaming of 200-mile road trips? That demands a large, heavy, and expensive battery pack. A 50-mile “around town” cruiser is a far simpler and cheaper goal.
- Power: Do you want to preserve the original driving feel, or unleash instant torque that pins you to the seat? Motor and controller choice directly follow this answer.
- Budget: Be brutally honest. The battery pack alone can range from $5,000 to over $20,000. Then add motor, controller, adapter, charger, and a mountain of small parts. A realistic budget prevents heartache later.
The Heart of the Swap: Sourcing Your Drivetrain
This is where the magic happens—replacing the internal combustion engine with an electric motor and its brain.
Motor and Controller Options
You’ve got a spectrum. On one end, salvaged components from a wrecked Nissan Leaf or Tesla offer incredible value and proven reliability. It’s a bit like using a donor organ—you get a complete, integrated system. The challenge can be the electronics, the “can bus” communication. It requires some technical savvy to make it all talk.
On the other end are new, purpose-built AC or DC motor kits from companies like NetGain, HPEVS, or Thunderstruck. They’re less powerful than a Tesla unit, sure, but they come with support, adapter plates, and controllers designed for the conversion market. They simplify the process immensely.
The Battery Pack: Your New Fuel Tank
This is the single most critical—and expensive—decision. Lithium-ion is the standard now, with Lithium Iron Phosphate (LiFePO4) being a popular choice for its safety and longevity. The pack isn’t one big block; it’s hundreds of individual cells wired together to create the required voltage and capacity.
You need to decide: buy a pre-made “drop-in” pack (easier, more expensive) or build your own from individual cells (cheaper, requires deep knowledge of battery management systems, or BMS). The BMS is non-negotiable. It’s the guardian that balances the cells and prevents over-charging or discharging, which is a fire risk.
| Component | Consideration | Pro Tip |
| Motor | AC for efficiency & regen; DC for simplicity & cost. | Match motor voltage to your battery pack voltage. |
| Controller | The “brain.” Must be compatible with motor type. | Invest in one with good programmability for tuning. |
| Battery Pack | Capacity (kWh) = Range. Voltage = Performance. | Always leave headroom in pack design; don’t max out specs. |
| Charger | On-board (convenient) vs. Off-board (lighter). | Get a charger that can use a 240V outlet for faster charging. |
The Nuts, Bolts, and Reality Checks
With major parts picked, the real hands-on work begins. This is where a practical guide becomes a daily companion.
Adapting, Mounting, and Connecting
You’ll need an adapter plate to mate the electric motor to the original transmission (if you’re keeping it). Custom motor mounts must be fabricated—this is where a good welder becomes your best friend. The battery boxes are another huge fabrication task. They must be incredibly strong, securely mounted, and often liquid-cooled or thermally managed.
Wiring is a project in itself. High-voltage cables are thick and require proper, color-coded insulation and routing. The low-voltage system—lights, wipers, radio—still needs 12V power, typically supplied by a small DC-to-DC converter from the main pack.
Safety Isn’t an Afterthought. It’s the Whole Point.
Working with high voltage is dangerous. Full stop. You must use proper personal protective equipment (PPE). Install a main service disconnect that physically breaks the high-voltage circuit. Fuse everything appropriately. And please, have a qualified electrician check your work before that first turn of the key. A shocking mistake here is literal.
Beyond the Drive: The Finishing Touches
The car moves under its own electric power—a huge milestone! But you’re not done. The little things define the build.
- Instrumentation: You’ll need a new gauge to show battery state of charge, power draw, and motor temperature. Old fuel gauges are often repurposed for this.
- Heating & Cooling: No engine means no free heat. An electric coolant heater or a simple resistive heater solves cabin warmth. Battery cooling might be needed for performance or hot climates.
- Regenerative Braking: Setting this up feels like a superpower. It captures energy when slowing down and puts it back into the battery. It extends range and reduces brake wear.
And then there’s the weight. The car’s balance changes. You’ll almost certainly need to upgrade the suspension, brakes, and possibly the tires to handle the new weight distribution and instant torque. It’s a chance to improve the vintage handling, too.
The Final Connection: Why We Do This
At its core, a vintage EV conversion isn’t about rejecting the past. It’s the opposite. It’s an act of profound preservation. You’re saving the aesthetics, the tactile joy, the head-turning beauty of a classic car—while giving it a new, sustainable heart for the next fifty years.
You’re not just following a practical guide. You’re becoming a link in the chain. The smell of old leather and vinyl remains, but now it’s mixed with the faint hum of a motor and the knowledge that your classic glides forward on sunshine, or wind, or whatever clean energy you choose. That’s a pretty powerful feeling. And honestly, it’s what makes all the complex, gritty work worth it.